December 26, 2009

More Christmas Crafts: Felt Stockings!

I can't believe its been a month since my last post! Preparing Christmas gifts definitely got the better of me this year: I made a felted purse for my mom (my first felted item ever that I had to re-knit and re-felt due to the first one shrinking too much in one direction), a scarf for my kid brother and aunt, and hats for my other brother and boyfriend. They all turned out really well; hopefully I'll have pictures to post soon.

In the meantime I have pictures of the stockings that I made for myself and my boyfriend. This is the first Christmas that I spent away from my childhood homes and in my own apartment. After finding myself faced with the realization that I wouldn't have Christmas morning access to my childhood Christmas stocking, I decided to make one.


I had a hard time finding pre-cut felt that was big enough for making a good sized stocking. Then I discovered that fabric stores carry felt by the both, something that I had never thought of before, mostly because I'm new to sewing. So I bought 1/2 yard of red and 1/4 yard of white felt and got to work. To make the general shape of the stocking I drew a sock shape on a paper bag that I had split open and laid out. I then cut this out and used it as a template. I first tried using a disappearing fabric pen to trace the shape, but that didn't show up too well on the red felt. A soft graphite 2Bpencil worked much better. I traced and cut out four of these sock bits. Then I repeated the process for the white fluff portion of the stocking, but made eight of these to both hide the seam between the two pieces and give the stockings a more three dimensional top.

I worked mostly with applique and simple embroidery to embellish the stockings. Evan requested Dracula with a Santa hat, which I was able to accomplish thanks to a stencil booklet that I picked up a the fabric store. Not quite the traditional Christmas motif, but it's what he wanted. I modeled my stocking off the one that I have at my mom's house: a snowy scene complete with a snowman. The cupcake, however, is a new addition.


After embroidering our names I sewed together the fluff pieces and then attached them to the stockings. I then paired up the stocking-and-fluff pieces and sewed them together . As a final touch, I used embroidery thread to create a loop from which they could hang. Together they took about two weeks to make, but I think the final product is definitely worth it.

November 29, 2009

Holiday Crafting

The holiday season is upon us. Although I've been working to start and finish hand-knit items for my family and friends, I've also been experimenting with my felt creations. I'm quite proud of my latest work.

Last year I bought a giant rawhide bone for my mom's dog and made a catnip pouch for our cat, Oscar. I'm pretty sure that it was the first time that he had encountered catnip, and he couldn't quite decide whether or not he liked it. He had a curious and somewhat distressed, but interested, look on his face when he took his first whiff of the green stuff. He even played with the pouch a little bit, but never got so excited as to pursue it when it fell out of reach.

But I've kept on making catnip toys (mostly because I still have catnip left over), but also because I enjoy the process. I'm also driven by a little economical incentive: I just know that there are others out there who--like me--give their pets a little gift for Christmas. I hope to help fill a niche with these holiday catnip buddies:


The Gingerbread Man Catnip Buddy

(I just put him up for sale on Etsy)

And in trying to be fair and equal opportunistic, I also made a catnip buddy for those who celebrate Hanukkah:

Star of David Catnip Pouch

(on Etsy as well)

I've also been busy experimenting with combining embroidered felt pillows with magnets. The holidays have presented me with a perfect opportunity to play with shapes, colors and themes. So far I've made two sets:


(on Etsy soon)

Each set presented its own minor roadblocks. I wanted to maintain a balance of color and variety of motifs in both. But I have to admit that the Hanukkah set was the most difficult. I had a hard time thinking of more than 3 motifs that would be both representation of the holiday and aesthetically pleasing. I'm happy with what I came up with.

Right now I'm working on making Christmas stockings for the apartment (finished product pics of those to come!). I'm also toying with the idea of making Christmas felt tree ornaments--one of which I already have nearly complete. Lots of projects. Lots of projects...

November 17, 2009

Triple the Flavors, Triple the Fun

I can't believe that it has been nearly a month since my last post! I've been meaning to post about my crafting and cooking, but preparations for the holidays have taken over: I'm experimenting with felting--something I've never done before--and trying to manage my time so that I can make Christmas gifts at a leisurely, relatively stress-free pace. Over the past few weeks I've also been trying to make some new items for my etsy shop (updates on these new items to come) and, until this morning, preparing for a holiday craft faire. But now with that out of the way, I have a few moments to share my latest batch of cupcakes...which I made for the faire.

I began with a batch of chocolate cupcakes. I usually use the recipe for basic chocolate cupcakes from Hello Cupcake!, but I didn't have any buttermilk. I thought about substituting lemon juice spiked regular milk, but decided that I didn't want to risk possibly compromising the overall texture of the final product. Instead I turned to the chocolate cupcake recipe in my Baker's Field Guide to Cupcakes cookbook, which calls for milk instead of buttermilk.

The mixing process went quite well; the Field Guide recipe was actually a bit easier than the Hello Cupcake recipe in that I didn't have to melt and cool baker's chocolate or run to the store for buttermilk. And the cupcakes turned out moist and chocolately--just as the description promised. I only hit a slight snag when in a moment of impatience turned to a older, less-than-ideal cupcake tin that produced somewhat sub-par results.

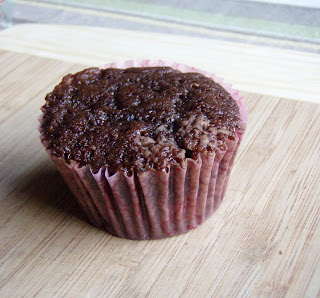
For the first dozen I used a dark, heavy cupcake tray that cooked evenly and produced beautifully domed cupcakes:


The other, lighter tin required nearly five more minutes of baking time and procured these:

sad, flat topped and slightly blistered cakes.

Lesson learned, I suppose: always, always resist the urge to cut corners and use sub-par baking tins. The good news, however, is that the cakes tasted the same regardless. But when it comes to aesthetics (even in cupcakes that will be covered in frosting) I prefer the dome to the flat top.

For the icing, I decided to make a variety of flavors partly because I figured that I could please more people (and therefore make more sales) with more flavor options, but mostly for fun. I chose my tried and true whipped cream frosting, which I decorated with some pink sprinkles:


For the second frosting batch I mixed in a heaping spoonful of boysenberry jam--an improvisation that I had tried a few months ago when the thought of using plain whipped cream frosting pained me. (If you like berry pie, then you'll love this boysenberry jam frosting!)


And for the last group of cupcakes I whipped up a peanut butter frosting that Ina provided. I had to improvise a little because I had to cut the portion by 1/3 but it turned out soft and velvety: the perfect compliment for the chocolate cake.


The cupcakes turned out great. I enjoyed decorating them and they sold really well. People seemed especially enthralled by the boysenberry frosting...I think I might try blackberry next time.

October 24, 2009

Project Diary: Fall Frenzy Magnets

Fall Frenzy Felt Magnets

(yay for alliteration!)


I've been thinking about making these for quite some time now. (I've been a bit busy--and lazy-- lately, but I finally got them done.) Just bits of felt, scrap pieces of yarn for stuffing, some embroidery for detail, felt glue, and left over magnets from when I made these:


I'm quite pleased with how the felt magnets turned out. I like the idea of having soft, plushy creatures hanging out on the fridge. So far, I've decided to make sets for Christmas and Hanukkah, and one with a Sea Creatures theme. I hope to sell them through my etsy shop or at the next Art Murmur in Oakland.

October 13, 2009

When You Buy 1 Pound of Basil...

I stopped by Berkeley Bowl (an amazing store with just about everything, btw) one day this week with the intention of picking up limes. In addition to the limes, I ended up walking out with acorn squash, whole nutmeg, heirloom tomatoes and a one pound bag of fresh basil. I really only wanted a small bunch of basil for salad dressing and fresh pomodoro sauce making purposes. However, the small bunches were quite wilted and not worth the $1.75. So I ended up buying a huge bag--stocked for restaurant purposes, I'm sure--for $5.

So what does one do with one pound of basil, you ask? Why, one makes pesto and savory tarts, of course! I immediately decided that this excess of fresh basil would give me an excuse to make a ton of basil pesto that I could then freeze and store away for winter. I know that I can very easily purchase fresh basil during the winter, but I have decided to start buying produce that is in season. (Even in California this will most likely mean passing on the fresh basil.) My logic here is that not only will this help decrease the amount of energy and resources put into producing and shipping out-of-season produce, but it will allow me to experience the change in seasons and thereby fully appreciate their respective foods. And now for the basil recipes...

Personal Basil and Tomato Tarts

I started with this recipe for savory basil and tomato tarts. I altered the recipe slightly and they turned out quite tasty.

Start with 1/3 cup fresh basil leaves and 1-2 cloves garlic.

Pulse in a food processor until they are chopped very fine.

Add 1¼ cups all-purpose flour, ½ tsp. kosher salt and 8 tbsp. of unsalted, chilled butter that have been cut into small cubes.

Pulse to combine.


Then add 4-5 tbsp. of ice cold water. I started with 3 tbsp. (left) and then added another 2 tbsp. It still seemed a little dry so I added one more (right), which gave me the perfect consistency.

Using a rubber spatula, turn the dough into the center of a 8x10" piece of plastic wrap.


Fold one edge over so that it covers half of the dough and pat down gently to flatten it out a bit (left). Repeat with the other edge (right). Then, fold in the other edges of the plastic wrap and cup your hands around the dough to form it into an even disk (bottom). Place the dough in the fridge for a few hours. Use this time to prep the filling, or if you have a bunch of basil left over, make pesto! (see below)

Once the dough has hardened in the fridge for a few hours, remove it from the plastic wrap, transfer onto a lightly floured surface (marble works really well) and use a floured rolling pin to flatten it into a 12" circle. Place one of the mini tart pans face down about 1" from the edge of the dough. Using a sharp knife, cut along the the tart pan, about 1" away from the edge.

Lay the dough in the pan (don't forget to insert the removable bottom first!) and use your fingers to gently press the dough along the ridges. Fold over any excess and press firmly until incorporated. Repeat for the remaining (3) tart pans. Cover with foil and place tart pans onto a cookie sheet. Bake for 10-12 minutes at 425° F. Remove tart shells from the oven and discard foil. If the dough has puffed up or peeled away from the sides--like mine did--firmly press back in place with the back of a spoon. Return tart shells to the oven and bake for another 5 minutes. Remove from the oven and lower the temperature to 375° F.

Fill tart shells with mozzarella cheese, a slice of tomato, a sprinkling of minced garlic, and a pinch of salt and pepper. I also added a bit of provolone and feta for some extra flavor.

Return the tarts to the oven and bake until the cheese has melted and the crust has browned along the edges, about 15 minutes (mine could have stayed in for a few more minutes, but they still tasted good!). Remove and add a bit of sliced basil. Let cool for a few minutes, then serve. This tart is quite good on its own, or with a salad that has been dressed with an olive oil and lemon vinaigrette.

Enjoy!
Tasty, Tasty Pesto

I made the pesto using this recipe. However, I altered it a little to accommodate my pantry and pocketbook: the recipe calls for 1/4 cup each of pine nuts and walnuts. As pine nuts can be quite expensive, I used 1/2 cup of walnuts instead.

And with personal taste in mind, I smashed the garlic cloves and pan fried them in a little olive oil over medium-low heat until they were tender and slightly golden. (Cooking the garlic helps mellow it a bit so that it isn't too overpowering). I also decreased the amount of olive oil by 1/2 cup and added about 2 tablespoons lemon juice to the finished pesto.

I then spooned the pesto into an ice cube tray and stuck it in the freezer. Once they were frozen solid (about 2 hours, just to make sure) I popped them out and put them into a ziplock bag and then back in the freezer. Each cube is the perfect portion for pasta for two.

October 7, 2009

Cupcake Party!

My aunt and I got together this week to make cupcakes. We have a pretty successful symbiotic relationship: I lend my baking skills and cupcake making experience, and she provides the ingredients and access to a spacious, well stocked kitchen. We each picked one cupcake recipe. I chose this Tiramisu Cupcakes recipe and she chose a recipe for Coco Loco Tequila Cupcakes from a Tequila cookbook that she has.

I liked the Tiramisu cupcakes the best...coffee and rum just don't stand a fighting chance next to coconut. (Although the Coco Loco Tequila Cupcakes did make me like dried coconut, one of my least favorite foods.)

Here are some before and after shots for your viewing pleasure:

Tiramisu Cupcakes

One rum-infused white cupcake, baked and ready for surgery.


Working with the knife in a completely vertical position, I inserted it about 3/4 of the way into the cupcake and cut a somewhat large circle. Then, I removed the center piece by gently pushing the blade of the knife against the outer edge. It popped out pretty easily; I just used my fingers to remove it completely once it came loose.


After adding the coffee-rum syrup to the center, filling it with the rum infused cream cheese icing, and replacing the top it looked like this:


And here's another one, a little top heavy with the luscious icing:


Coco Loco Tequila Cupcakes

I followed the recipe pretty closely. The only alteration that I made was that I used about 2 tsp of fresh ginger (instead of 2 tbsp), which I think was just perfect. Any more would have over powered the coconut flavor. In the future I think that I will skip adding the coconut milk in the icing...it made the icing a little too runny for my preference. Besides, the coconut extract and shredded coconut add a lot of coconut flavor. I used a rubber spatula to apply the icing and then sprinkled shredded coconut over the top.

All I can say for both is Yum! Both are excellent choices if you want to make a good impression or indulge in some decadent treats.

September 22, 2009

Two Pizzas Are Better Than One

Yesterday I posted about The Perfect Pizza Dough recipe that I use whenever I make pizzas. Here are my latest pizza creations: the first was inspired by a zucchini pizza from a local bakery, and the second by the tastiness that is a pizza loaded with lots of veggies.

Zucchini, Red Onion and Feta Pizza


1/2 - 1 medium zucchini, sliced very thin
1/6 medium red onion, thinly sliced
1 small/medium tomato, thinly sliced
8 oz crumbled fresh mozzarella cheese
handful of feta cheese
1 - 2 tsp olive oil
salt and pepper to taste
fresh basil
freshly grated parmessan cheese

Evenly disperse mozzarella on surface of dough. Add zucchini, red onion and tomato in an even layer. Sprinkle with salt, pepper and feta to taste. For a little extra flavor and perfect browning, use your fingers to dabble olive oil onto the outer edges of the crust. Bake on 450 degree Fahrenheit preheated pizza/baking stone for 10-16 minutes, depending on preference. Remove from oven and sprinkle hot pizza with sliced basil and parmessan cheese.


Garden Veggie Pizza


1 can marinated artichoke hearts, drained well and cut into quarters
1 medium tomato, thinly sliced
1/8 medium red onion, thinly sliced
8 - 10 kalamata olives (optional)
1 - 2 cloves garlic, chopped
3 - 4 brown mushrooms, thinly sliced
8 oz. crumbled fresh mozzarella cheese
handful of feta cheese
1 - 2 tsp olive oil
salt and pepper
fresh basil
freshly grated parmessan cheese

Evenly disperese mozzarella on surface of dough. Add the veggies and half of the garlic in an even layer. Sprinkle with feta, salt and pepper, to taste. For a little extra flavor and perfect browning, use your fingers to dabble olive oil and garlic onto the outer edges of the crust. Bake on 450 degree Fahrenheit preheated pizza/baking stone for 10-16 minutes, depending on preference. Remove from oven and sprinkle hot pizza with sliced basil and parmessan cheese.

The Perfect Pizza Dough

I recently acquired a baking stone, a stand mixer and an immense sense of satisfaction from making yeast-based doughs. Successfully combining simple ingredients in just the right way so that the wonders of fermentation transform them into bread is just too satisfying for me to forgo.

My first attempts at making pizza dough sans proper preparation (i.e. proofing and resting), equipment (baking stone) and time, resulted in crust that was lacking in flavor, texture and satisfaction. However now that I have all three, I can finally indulge in tasty, crispy homemade pizza--whose crust is good enough to eat without the toppings.

I found the pizza dough recipe through Foodgawker (my new-found and preferred go-to site for recipes) and decided to try it because it was simple, straightforward and relatively quick. I've included said recipe below, but you can also find it here. This recipe produces enough dough to make two medium sized, relatively thin crust pizzas. Accordingly, I take advantage of the opportunity to make two varieties of pizza. Below you will find my latest pizza recipes. Enjoy!

Perfect Pizza Dough
Equipment:

Pizza or baking stone
Pizza paddle
Baking sheet (or second pizza paddle)
Rolling pin
Stand mixer (optional)


Ingredients:
  • 1 package (approx. 2 1/4 tsp), active dry yeast
  • 1 1/3 cup warm water (I like to use a combination of boiling water that I heated on the stove and cold tap water...cuts down on wasting water while waiting for the tap to heat up.)
  • 2 tbs olive oil
  • 3 1/2 to 3 3/4 cups all purpose flour
  • 1 tbs salt

Mix the yeast and water in a mixing bowl. I like to use the mixing bowl of my stand mixer, because it reduces waste and the number of dirtied dishes. Cover and let sit for 5 minutes in a warm place, like in a sunny spot.

Ideally the yeast should proof into a nice foam, but I've found that some bubbles and "strands" of yeast when you swirl the mixture are good enough for proper fermentation.

Then add the flour, salt and olive oil.

Mix ingredients by hand or on low speed until thoroughly combined, about a minute. Sprinkle a good amount of flour onto your kneading surface (if using your hands, do this before you mix the dough) and turn the dough onto the surface.


Knead the dough by repeatedly turning and folding the dough in half with the press of the palm of your hand for 7-10 minutes, adding flour in small increments until the dough is soft and no longer sticky.


Next, form the dough into a round, smooth ball and place in a large bowl.


Cover the bowl with a towel, and let rise in a warm area, such as a sunny patch near a window, for one hour. Try your best not to peek.


Take advantage of this hour by prepping the ingredients for the pizzas: cut the veggies and other toppings, shred the cheese, etc.

After about one hour, the dough should double in bulk and look something like this:


Preheat the oven and pizza stone to 450 degrees Fahrenheit.

Punch the dough (my favorite part) and turn onto a well floured surface.


Knead lightly, but firmly, for about a minute, adding flour to the dough and the surface as needed. Break the dough into two evenly sized portions, and form each into a smooth ball. Beginning with one ball, work the dough into a flat disk using a lightly floured rolling pin. Flip the dough and re-flour your surface periodically in order to prevent the dough from sticking.


Once you have rolled the dough to your preferred thickness or the size of your pizza stone, transfer the dough to a pizza paddle that has been seasoned with a tablespoon of flour and 1 -2 teaspoons of cornmeal.


Add your toppings:
When transfering the pizza to the oven, pull the rack that the hot baking stone is resting on half way out. With the front end of the paddle positioned near the far edge of the stone, angle the paddle slightly and slide the pizza onto the stone using short, jerking forward motions. Bake for 10-15 minutes, depending on dough thickness and crispness preference. While the first pizza is baking, roll out and top the second ball of dough on the pizza paddle.

Remove the baked pizza with a cookie sheet. Feel free to use an ovenmit clad hand to help transfer the pizza to the cookie sheet. Place the second pizza onto the stone and bake until done. Transfer pizzas to a cutting board and let cool for a few minutes. Cut, serve and enjoy.